Animation
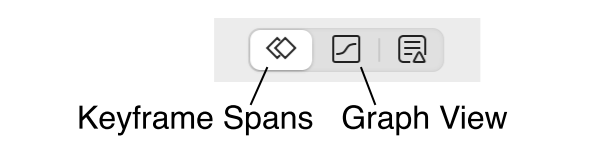
Animations are created on a timeline. There are two different views to the timeline: one displays keyframe spans and the other one displays graphs.
Timeline
Below you can see the main parts of the Timeline. The timeline shows animations bars and keyframes.

By default, all objects are shown in the Timeline. To show only objects with keyframes, select the Action button and choose the Show only animated objects option.
Animation bars can be used to move all keyframes for objects. Keyframe timing can be scaled by dragging the edges of the bars.
The animation bars are gray by default. To change their color, double click the name of the object. A dialog to rename the object and to change the color is opened. The Automatic color option makes the object to use the color of the parent object. Changing the color will also change the object's highlight rectangle color on the canvas.
By default, the playhead and keyframes are snapped to the timeline's frames (the small tick marks). To change the frame interval, change the document frame rate value by choosing the Document Properties menu option and changing the Fps value.
To allow the playhead and keyframes to move freely without snapping, deselect the Animation > Timeline Snap > Snap to Frames menu option.
To make keyframes to snap to other keyframes, select the Animation > Timeline Snap > Snap to Keyframes menu option. It is also possible to temporarily toggle keyframe snapping by holding down the shift key while dragging the playhead or keyframes.
Adding, Moving and Deleting Keyframes
You add keyframes to the timeline and values between the keyframes will be automatically calculated.
To add a keyframe to an object:
- Select the object.
- Click the Add keyframe button and choose a property. A keyframe is added for the property.
- Move the Playhead to another time.
- Add another keyframe with the Add keyframe button or by changing the property's value.
If a property is already animated, then keyframes will be added automatically when you change the property's value.
You can change the time of a keyframe by dragging it to the left or right.
Keyframes can be deleted by selecting them and pressing the Delete key.
The order of keyframes can be reversed. Select the keyframes you want to reverse and choose the Animation > Reverse Keyframes menu command.
The following properties can be animated:
- Position
- Anchor Point
- Rotation
- Scale
- Skew
- Visibility
- Opacity
- Stroke Opacity
- Fill Opacity
- Stroke Color
- Fill Color
- Stroke Width
- Stroke Dash Array
- Stroke Dash Offset
- Filter
- Width and Height
- Path Shape
- Rectangle Radius
Separated Transform Properties
It is possible to separate transform properties to set keyframes or easings independently for X and Y coordinates. For instance, a bouncing ball can have a constant move in the X direction and a bouncing movement in the Y direction.
To separate properties, select property lines in the Timeline and choose the Object > Transform > Separate Dimensions menu command. To unseparate properties, select them and choose again the Object > Transform > Separate Dimensions menu command.
Only Position, Anchor, Scale and Skew properties can be separated.
Auto-Keyframing
Auto-Keyframing can be used to automatically add keyframes for properties that you modify. It speeds up creating animations, because you do not have to press the Add keyframe button and select the property from the menu.
Enable Auto-Keyframing with the Auto-Keyframe button or the Animation > Auto-Keyframe > Enable Auto-Keyframing menu command. You can disable Auto-Keyframing by selecting the same button or menu command again.
To use Auto-Keyframing:
- Enable Auto-Keyframing using the Auto-Keyframe button or menu command.
- Move the Playhead to the desired time on the Timeline.
- Modify the object's properties. Keyframes are automatically created for them.
- Disable Auto-Keyframing using the Auto-Keyframe button or menu command.
Note that even if Auto-Keyframing is disabled, new keyframes will be added automatically to properties that already have keyframes. Auto-Keyframing only helps creating the first keyframe automatically.
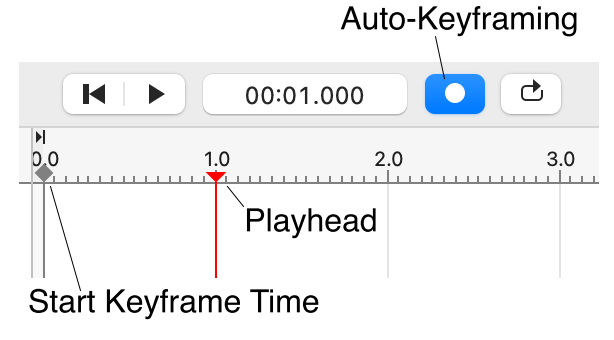
By default, two keyframes are added for properties which do not have any keyframes. One at the Start Keyframe Time and one at the Playhead time. Start Keyframe Time is indicated by a diamond headed line, resembling a keyframe. You can change the Start Keyframe Time by moving the Playhead to the desired time and then choosing Animation > Auto-Keyframe > Set Start Keyframe Time.
If Start Keyframe Time and Playhead times are the same when you enable Auto-Keyframing, the Playhead is moved forward by one second so that two keyframes can be added.
You can disable the start keyframe insertion by deselecting the Animation > Auto-Keyframe > Allow Start Keyframe Insertion menu option. Once deselected, only one keyframe is added at the Playhead time.
It is very easy to accidentally leave Auto-Keyframing enabled. When you modify objects this may create an excess amount of keyframes. So, be careful with Auto-Keyframing and remember to disable it once you have finished animating objects. When you enable Auto-Keyframing, the Playhead becomes red, the Auto-Keyframe button turns red and the text “Auto-Keyframe” is displayed on the canvas. These help you to remember that Auto-Keyframing is enabled.
Copying Keyframes
You can copy keyframes by selecting them and choosing the Edit > Copy menu command. Then, move the Playhead to a new position and paste the keyframes with Edit > Paste.
Keyframes can be copied from one object to another. First, copy the keyframes, then select the other object and paste.
You can also copy animations from one property to another. For instance, you may want to copy the opacity animation to the fill opacity property. First, copy the opacity keyframes. Then, select the fill opacity property line and paste. The keyframes will be pasted at the Playhead time. Note that the source properties and target properties must be of the same datatype, e.g. numeric properties can only be copied to numeric properties and color properties to other color properties.
Motion Paths
When you add a keyframe for an object's position, you are actually creating a motion path. The motion path is visible on the canvas as a dotted curve. You can modify the motion path with the Selection tool by selecting and dragging its diamond shaped control points. You can also make the motion path curved by dragging the motion path lines.
You can make the object rotate along the motion path by selecting Orient along path under the Transform property section.
A normal path can be copied to a motion path using these steps:
- Select the path and copy it using the Edit > Copy menu command.
- Select a Position keyframe line in the Timeline. If the object does not have a Position keyframe line, then add a Position keyframe manually so that it can be selected.
- Select the Edit > Paste menu command.
Note that CSS animated curved motion paths work only in Chrome. Motion paths with straight lines work in all browsers except Internet Explorer. JavaScript animated motion paths work in all browsers.
Shape Animations
Path objects can have shape animations, also known as path morphing. You can create them by clicking the Add keyframe button and selecting Shape, or by activating Auto-Keyframing and then moving nodes with the Node tool.
Shapes can be copied from an object to another with the Paste Shape menu command, which is useful when creating a shape animation from existing objects.
If the shape keyframes have different amount of nodes, then additional nodes are added to the end to make the animation possible. It may not give the best result, so often nodes need be added manually to the shapes to make the animation look better.
The best morphing results are usually created by making sure that:
- The start node is at the same position in all keyframes. You can change the start node by selecting a node and choosing the Object > Set Start Node menu command.
- The path direction is the same in all keyframes. You can change the path direction by selecting the Object > Reverse Path command.
- The node count is the same in all keyframes. You can add and delete nodes with the Node tool or the Pen tool.
The start node and path direction indicator is visible when the Node tool is selected. For more information about the indicator, see Editing Nodes. The node count is visible in the Property Panel.
Easing
By default, animations use linear interpolation. It means that values between keyframes change with a constant speed. It is possible to use cubic bezier curved interpolation, which often gives a more natural movement, as the animation gradually speeds up or slows down. The third option is to use stepped interpolation, which causes an instant change. You can control the interpolation type of a keyframe with the buttons at the bottom of the Timeline.
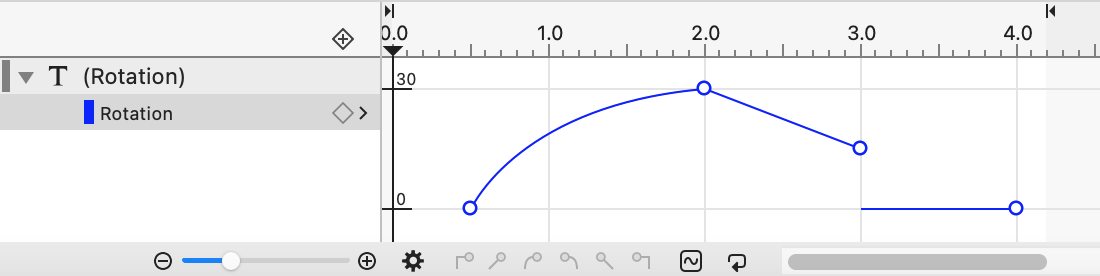
The Graph view shows how the values between keyframes get interpolated. The image above shows a curve for a cubic bezier, linear and stepped interpolation.
You can change the time and value of a keyframe by dragging it in the Timeline. Selecting a cubic bezier interpolated keyframe reveals its bezier control handles. Use them to adjust the cubic bezier curve. If you do not see the handles, then you can add them by pressing the easing buttons at the bottom of the Timeline. Alternatively, you can use the Easing Presets panel to adjust the curve.
The position and scale properties display two curves, a red curve and a green curve. The red curve shows the X coordinate and the green curve shows the Y coordinate. Keyframes on those curves are synchronized, i.e. when you move or change the easing on one curve, the other one also moves and changes.
Note that gradient color animations always use stepped interpolation.
When adding new keyframes to animations, linear interpolation is used by default. The default interpolation type can be changed by modifying Default Easing in Document Properties.
Easing Presets
Easing presets can be used to make animations look more consistent. They make it easy to reuse the same easing for multiple keyframes.
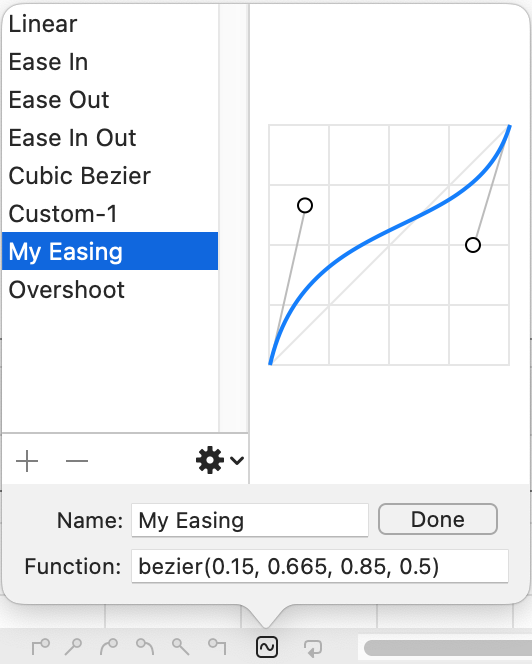
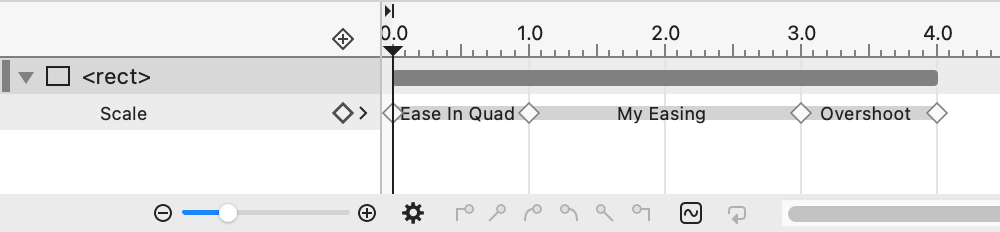
Press the Easing Presets button to access the presets. The panel lists commonly used easing values, such as Ease In, Ease Out and Ease In Out values. It also lists custom easings.
To use one of the presets:
- Select keyframes in the Timeline.
- Press the Easing Presets button.
- Select the desired easing by clicking it.
- Close the Easing Preset panel by clicking the Easing Presets button again, by clicking outside the panel, or by double clicking a preset in the list.
You can also create your own custom easings, which can be used in the document as many times as you want.
- To add a new custom easing, press the Add (+) button in the easing panel. Then, change the name and function of the new custom easing. Press Done when you have finished editing the custom easing.
- To edit a custom easing, select it and press the Edit button.
- To delete a custom easing, select it and press the Delete button.
- To duplicate an existing easing, select it and press the Add (+) button. The selected values will be used for the new custom easing.
- To copy a custom easing from one document to another, select it and choose Copy Easing from the action menu. Then, choose Paste Easings in the other document. It is possible to copy all easings by choosing the Copy All Easings menu item.
By default, easing names are shown in the timeline. To hide them, select Show easing names in the timeline in the Settings.
Iterations
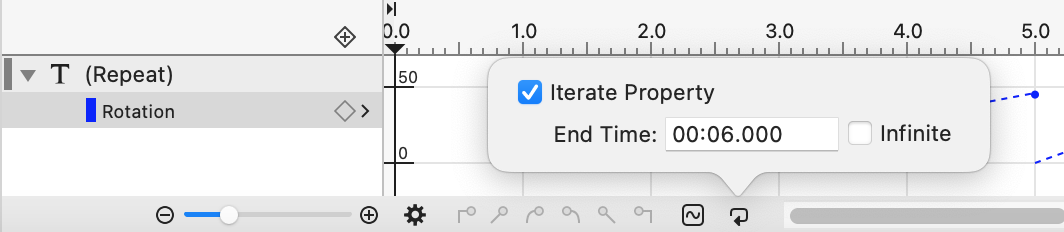
Animations of individual properties can be repeated. Select a property line in the Timeline and select the Iterations button to access the iteration settings at the bottom of the Timeline. You can enter the iteration end time or you can select the Infinite checkbox to repeat the keyframes forever.
Playing Animations
You can scrub the animation by dragging the Playhead in the Timeline. This is the fastest way to see how your animation looks.

Press the Play button to start the playback of the animation. If the Loop Playback button is selected, then the animation plays in a loop until the stop button is pressed. The play range defines the start and end time of the playback.
To start the playback from the Play Range In point instead of the current Playhead position, select the Animation > Playback Options > Play From Start menu option.
To make the Playhead return back to the editing time after the animation is stopped, select the Animation > Playback Options > Preserve Editing Time menu option.
If the animation contains links, you can move the mouse over them to see the destination URL. Links cannot be clicked inside Keyshape to traverse them. To test links, preview the animation in a web browser.
By default, Keyshape tries to play the animation at 60 frames per second. If the document has many objects, then the renderer may not be able to draw at the maximum frame rate and a lower frame rate will be used. In that case, frames are dropped to keep the animation at real-time speed. This is also how web browsers play SVG animations.
You can play the animation at the frame rate set up in the document object by selecting the Animation > Playback Options > Stepped Playback menu item. This option is useful to see how animated GIFs and image sequences will appear because it uses the same frame rate.
Interactivity cannot be tested while the animation is playing in Keyshape. To test interactivity, preview it in web browser.
Previewing in Web Browsers
To preview the animation in a web browser, press the Preview in Browser button. This exports a temporary SVG version of the document and opens it in a web browser. Press the small arrow to open a list of all web browsers that have been installed on your computer. You can preview the animation in any of them.
You can also change the preview animation type by pressing the small arrow. The options are KeyshapeJS or CSS animation. The animation type can also be changed by selecting the document object in the Object Tree and choosing the Browser Preview and Compatibility option.
Play Range
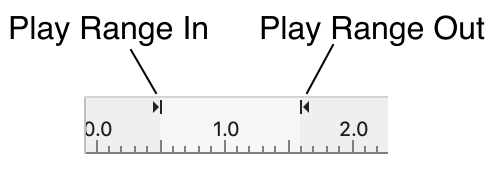
The playback start and end time can be modified by setting a play range. The Play Range In and Out times define the range for the playback. Playing the animation, previewing it in a web browser and exporting are affected by the play range.
To change the play range, do one of the following:
- Drag the play range markers on the Timeline.
- Use the menu commands Animation > Mark Play Range In and Animation > Mark Play Range Out.
- Set the play range times in the document object.
The document object shows few special values for the Play Range Out:
- Automatic - the end time is the last animation time in the document.
- Fixed Time - the end time is a fixed time value.
- Infinite - the play range has an infinite duration.
The infinite duration is useful when creating SVG CSS animations which contain animated properties with infinite repeats.
Time Markers
Time markers are indicators on the timeline. They can be used to mark interesting time points in the animation. Time markers can have a name and color, which helps distinguishing them from each other.

To add time markers to a timeline, move the playhead to the desired time position and choose the Animation > Time Markers > Add Time Marker menu command.
To move a time marker to another time or to edit its name, choose the time marker and select the Animation > Time Markers > Edit Time Markers menu command. It will open a dialog where the details of the time marker can be edited. Time markers can also be moved on the timeline by dragging them with the mouse.
To delete a time marker, select it on the timeline and choose the Edit > Delete menu command or press the Delete key.
To copy a time marker from a document to another, select it and choose the Edit > Copy menu command. In the other document, choose the Edit > Paste menu command.
Time markers can be locked so that they are not accidentally moved with the mouse. Choose the Animation > Time Markers > Lock Time Markers menu command to lock and unlock time markers.
When exporting SVG with KeyshapeJS animation, time markers are included in the exported document. The KeyshapeJS API (its play and pause methods) accept time marker names as parameters. Note that only the document level time markers are exported. Symbol level time markers are not exported.