Editing Objects
Selecting Objects
Use the Selection tool or the Transform tool to select objects on the canvas. Click on an object to select it. To select multiple objects, Shift-click. You can also select objects by dragging a rubber band around them.
Use the Node tool to select objects inside groups. To modify or move only some of the objects inside a group, use the Node tool to select the objects and then switch back to the Selection or Transform tool.
To move and resize an object, use the Selection tool. Only rectangles, ellipses, paths, images and use objects can be resized. To change the size of multiple objects, size of text, group or layer objects, use the Transform tool to scale them.
Hidden or locked objects cannot be selected via the canvas. When you want to delete them or change their properties, select them in the Object Tree.
Transforming Objects
When an object is transformed, it means that it is positioned, rotated, scaled or skewed. Scaling, rotation and skewing happens around the anchor point of an object. You can use the Transform tool to transform objects and to move anchor points.
The Transform property section gives you accurate numeric access to the position, anchor point, scale, rotation and skew values. The properties are summarized below with an image explaining how they are related to each other.
- Position - the coordinates of the object's anchor point relative to its parent.
- Anchor - the coordinates of the anchor point within the object.
- Scale - the scale factor of the object. The object is scaled relative to its anchor point. Use negative values to flip the object.
- Rotation - the rotation angle in degrees. The object is rotated around its anchor point.
- Skew - skew angle in degrees.
![]()
The Object > Transform menu has commands for standard transforms, such as flipping and rotation. It includes a command to center the anchor point.
Use Orient Along Path to make an object rotate to the direction of movement when it travels along a motion path.
Scaling with the Transform tool causes everything in the object to be scaled, including the stroke width. Scaling also affects rounded corners in rectangles. To change the size of an object while preserving the stroke widths and rounded corners, use the Selection tool.
Arranging Objects
Objects are drawn on the canvas in the same order as they are listed in the Object Tree. The topmost objects are drawn on top. The order of the objects can be changed using the Object > Arrange menu, or by dragging the objects in the Object Tree.
Duplicating Objects
You can duplicate objects with the Edit > Duplicate menu command. You can also create duplicates by holding down the Option key before moving the object on the canvas.
Aligning Objects
You can align objects with the Object > Align and Object > Distribute menu commands. The Align to Pixel Grid menu command aligns objects to the pixel grid.
Editing Nodes
Shapes (rectangles, ellipses, paths and text) are made of nodes, which can be modified with the Node tool. When rectangles or ellipses are modified, they will be automatically converted to path objects. To modify nodes in text objects, you must first manually convert them to paths with the Object > Convert to Path menu command.
Note that after a rectangle has been converted to a path, you cannot modify its rounded corners anymore. Also, after text is converted to a path, you cannot modify its text properties.
A node can be a corner node or a curved node. Curved nodes have Bezier control handles to modify the way they are curved. To keep curves smooth, a node can be made asymmetric or symmetric. To move the control handles independently, make the node a cusp. The controls for these are enabled in the toolbar when nodes are selected using the Node tool.
Delete nodes by selecting them and pressing the Delete key. To delete nodes so that the shape of the curve is preserved, use the Option+Delete key.
The app toolbar has these Node Actions:
- Join the selected nodes merges the selected nodes. You can only merge the endpoints or adjacent nodes together. Middle nodes in different objects can't be merged together.
- Break path at selected nodes splits paths into subpaths at the selected nodes.
The Node tool can select and modify path segments. Click and drag on a path segment to make it a curve. Select a path segment and press the Delete key to delete the segment.
The start node and path direction indicator is visible when the Node tool is selected. It is shown as a blue arrow. To change the start node, use the Object > Set Start Node menu command. To change the direction, use the Object > Reverse Path menu command.

Converting Objects to Paths
Objects can be converted to paths with the Object > Convert to Path menu command. Note that once an object becomes a path, you cannot change its original properties anymore.
To extract only the object's stroke to a path, use the Object > Convert Stroke to Path menu command.
Paste Style and Shape
The Paste Style menu command copies style properties from one object to another. The copied properties are the fill, stroke, opacity, text font, line height, tracking, word spacing, and blending mode properties.
To copy and paste style:
- Select the object which has the style properties to be copied.
- Choose the Edit > Copy menu command.
- Select the receiving object.
- Choose the Edit > Paste Style menu command.
You can also copy style properties from SVG code. You can try it by copying the following code and pasting it with Paste Style to change an object to have a dashed blue line.
<rect width="10" height="10" stroke="#4040c8" fill="none" stroke-width="10" stroke-dasharray="10 20" stroke-dashoffset="23" stroke-linecap="round" stroke-linejoin="round"/>
The Paste Shape menu command can be used to copy the shape of an object to another object. It is useful when creating shape animations.
To copy and paste shape:
- Select the object which has the shape to be copied.
- Choose the Edit > Copy menu command.
- Select the receiving object. If you are copying the shape to a shape animation, then make sure that the receiving object has shape keyframes and the Playhead is positioned at the correct time. Alternatively, enable Auto-Keyframing to create keyframes automatically.
- Choose the Edit > Paste Shape menu command.
Reversing Paths
A path has a start node and a direction. You can use the Object > Reverse Path menu command to reverse the order of the nodes in the path. If the path is made of multiple subpaths, you can reverse only some of the subpaths by selecting nodes in them.
Combining Paths
A path can be made of multiple subpaths. The Object > Combine menu command combines multiple paths into one path with multiple subpaths. Object > Break Apart breaks subpaths into separate paths.
Path Operations
You can combine paths with Object > Unite, Object > Subtract, Object > Intersect and Object > Exclude. These operations require at least two objects to be selected. These operations will merge the overlying objects to the backmost object.
- Unite - adds all overlying objects to the backmost object.
- Subtract - removes areas where the overlying and backmost objects overlap.
- Intersect - keeps only areas where the overlying and backmost objects overlap.
- Exclude - adds all the selected objects together and then removes areas where the overlying and backmost objects overlap.
Hiding and Locking Objects
You can hide objects. Click the eye symbol in Object Tree to make them hidden or visible.
To prevent accidental modifications to objects, lock them. Click the lock symbol to lock or unlock them. Locking prevents selection of objects via the canvas, however you can still select them in the Object Tree.
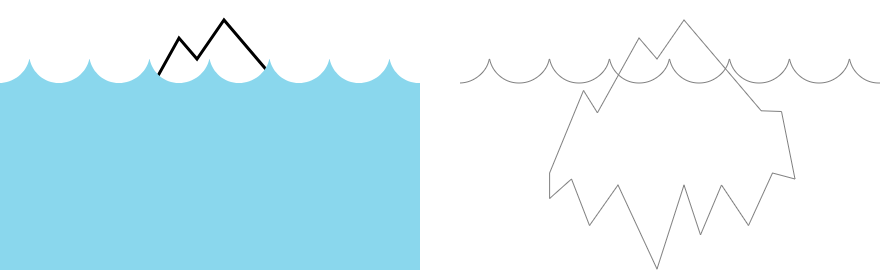
Outline View
Outline view shows objects as wireframes without any fills or strokes. It is useful when objects behind other objects need to be seen.
To enable the outline view, choose the View > Outline menu option.
Below is an example of an iceberg showing how the outline view makes the hidden parts completely visible.